Saturday, December 25, 2010

Merry Christmas!

No cards were sent out this year, but I still had fun playing around with them!
Merry Christmas!
Hope your day is filled with friends, family, happiness & lots of good food!

Friday, December 24, 2010

A Few Favorite Ornaments


Each year growing up, we got a new ornament, and I haven't truly appreciated them until this year. We've started the tradition for Luke and I hope he will appreciate them someday too (or at least maybe his wife will).

One of my first year ornaments (1986)

I have lots of different crystal angels amongst my tree.I was loving a lot of Walmarts ornaments this year, but I especially loved these glittery bows for $1

Scott's mom, Brenda, also has given us an ornament every year since we've gotten married. This was our first one:

Here are two more that she gave us:
This is Luke's first ornament (2008)

Thursday, December 23, 2010

A Quick & Easy Holiday Shirt

I saw this idea on Design Mom for Bleached Cotton Tees and decided to give it a try for Luke's Christmas shirt this year.

What you need:


100% Cotton Tshirt
Bleach
Cotton balls, and spray bottle
Vinyl/contact paper design
(I chose a Christmas Tree, and cut it out with my cricut, but you can cut out simple designs like this with scissors pretty easily)

Here's what you do:

Secure your vinyl design on your T-shirt.
Be sure to put rags (ones you don't care about getting bleached out) between the layers of the shirt so that the bleach doesn't leak onto the back of the shirt

Take a cotton ball, dip in bleach and bleach out around your design. My advice here is to do a little around the whole design, let it dry and then see if you want to do more bleach. Also, I used a spray bottle and let it drip & spray a bit around my design for an added effect--but be sure to do a little first and let it dry. The spray dots don't show up as fast as the cotton ball method.

Let the whole shirt dry and then remove your vinyl designs. There may have been some leaks and drips, but these will just add character to your shirt!

I will definitely be playing around with this idea a little more, but this came out pretty good for a first try! Overall it only took a few minutes to do (most of the time was spent letting it dry)

Wednesday, December 22, 2010

It's beginning to look a lot like Christmas...

Actually, it's looked like this all month :)
I found so many things I wanted to make this year but didn't have the time or the heart to do many of them. I think that I may be doing Christmas crafts all next year so that I have the most ridiculously amazing house next Christmas.
yeah right.
You should see the non-Christmas project list!!

The Front Door
[now complete with snowflakes on the windows and real snow covering everything]
Entry

The tree. I was going to put Santa's sleigh in the sky, but never got around to it


The vinyl never made it onto this red sign...

Sweater Stockings I made them in 2008

The sleigh I made in 8th grade wood shop (it was a mandatory class). I decided to paint it gold and put a vinyl snowflake on it this year

O Christmas Tree,
it's real! Yay for real trees.
I guess he's kind of part of the decor sometimes too :)
I turned my old read sweater into a pillow, I won the other pillow at a Decor Swap Party


The End.
Merry Christmas!

Friday, December 10, 2010

Neighbor Gifts--The Gift of Hope, no Soap...

This might spoil it for some of you that are my neighbors, but for the rest of you time may be running out for a good idea, so I wanted to share mine!

AND, it only cost me $1 per family!

AND i'm entering it the Poppies at Play linky party today so that is the real reason I'm posting this! *update* Also entering in the Tatertots and Jello linky party

Introducing the gift that keeps on giving all year long:


So Here's what you do:

~Go buy up the 88 cent Equate soap (or Soft Soap) at Walmart, I got mostly green ones because it was festive. I got a few red ones, but they are harder to read. The blue ones are good too but the labels are harder to get off.

~take off the front and back labels on the soap. I used Goo Gone to help get the stickies off!

~You'll need a few transparency sheets that are good for printing, and a laser printer--
~Design your art and then print it out on transparency sheets with a laser printer, or you can get them printed at a place like FedEx.

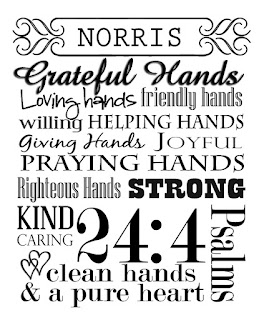
I personalized each one with their last names:
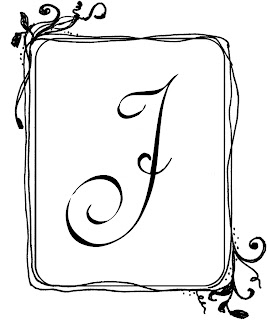
I also made a few with just a monogram & a cute border like this one:

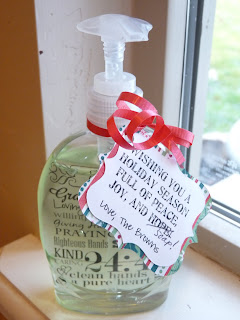
~After you get your transparencies all printed, you cut out each one and roll it up and stick it in the soap. You can use the pump to help it unroll and secure it into place.

~Then tie a ribbon on it and a tag that says this:

That's it!
Your neighbor or teacher with LOVE it.
The best part is they can keep using the bottle by just adding more soap!

merry christmas!!

**more tips & how to personalize these can be found in this later post here**

[if you use my images to make these soaps,
please use them for personal use only, thanks!]

other posts you may like

Related Posts Plugin for WordPress, Blogger...