Showing posts with label Home. Show all posts

Sunday, January 05, 2014

Sam's Room Update

The last time I showed you Sam's room was October 2012 and at that point it still had about 5% more changes that needed to be addressed.  A few details had yet to be addressed--like the lamp, the changing table and the shelves above the changing table.

So here I am over a year later and I can finally say Sam's room is completely done.
Here's what it looks like now:
Not huge differences to this viewpoint--
I've added curtain hold-backs to the window, taken out the bumper from the crib and switched out 2 of the framed art pieces in the gallery.

However, this side of the room looks quite a bit different.

Here's what it looked like before:

The floating Shelves have finally been styled in a way I like enough to leave it be.

Sam LOVES cars and trucks, and he received cars & trucks sticker/decals for Christmas.  I wanted to put them up so he would have something to look at during diaper changes.  I didn't like too much random with the cars just plopped on the walls wherever.  So I designed and cut out roads on black vinyl with my Cricut and then made this:  

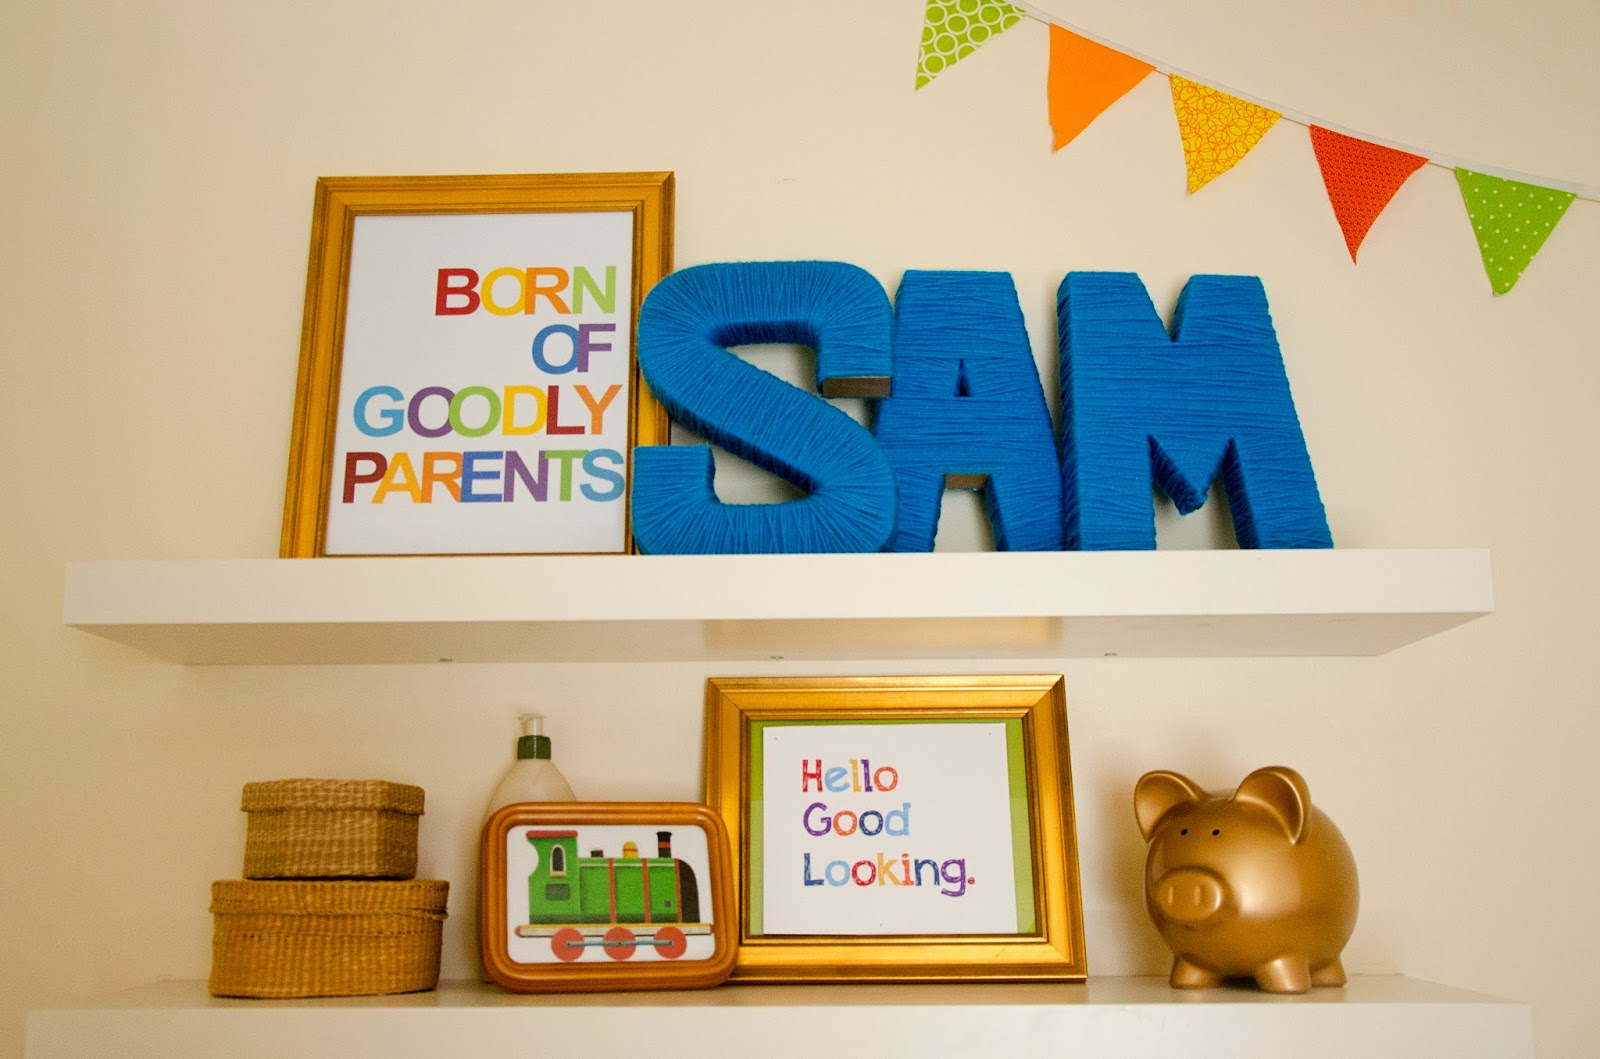
Other changes on this side of the room include a new/old dresser I found in the classifieds, a new lamp (relocated from Luke's room), a crate for books, and new stylization on the floating shelves.  I like the way the dresser looks in the room, so for now I will leave it be and not paint it.  If I ever get a new crib I will probably want the dresser to match it so I'll probably paint it then.

 The confetti wall and the entry of the room are the same, but here is what they look like:
 
Probably the only room in the house I consider to be D.O.N.E.
Baby Room-More Details
(before this room was completely updated)


Thursday, September 12, 2013

Playroom Loft Update

This is what our playroom area looked like for the majority of the last few years:DSC_3907-2

Ok well, actually it looked more like this…DSC_7043-2

Yeah.

Anyway…

Not a whole lot on the walls, and not that much storage for toys which always seem to be multiplying.  DSC_3911-2

The couch belonged to my sister, and she took it to her new house (she didn’t have room for it before in their old house).  It is a family heirloom, so the longer in my house it stayed the more worried I got about Sam destroying it.  I already had to scrub pen mark artwork off the back once.)  Once it was gone, it left a lot of raw space to work with, so I decided to redo the entire space!

So now it looks like this:DSC_4045-2

We moved the toy bin unit to Luke’s room to hold his dinosaurs and a few other toys that were just his.  I got rid of the other two tables and then bought two 2x4 Expedit units from IKEA.  We added legs to the bottom of each of the shelves to add some height and character to the shelves. 

Then the hard part…finding bins for the toys.  You would think that with the popularity of these shelves and people’s ever-growing need for storage and organization there would be tons of options.  Not so.  I didn’t like any of the IKEA options except for the basket-type, but they were kind of pricey at $14.99 each.  That was basically my probably through-out the whole search.  The baskets I liked that were the right size, were either not the right color, or too expensive.  Other baskets that were good prices were usually too small.  I eventually found these bins at WalMart.com, but I really wanted red ones.  After thinking about the design of the room some more I decided to pull in more black, so I went with the black bins.  Turned out to work really well in the space!  I did bite the bullet and spend more than I wanted at 12.97 each, but in the end the bins are huge and hold a ton of toys.  I think they will hold up to the kids wear and tear, too.  DSC_4047-2web

I had Scott install the curtain rod, and I used these curtains that used to hang in my kitchen once upon a time.

DSC_4044 Nothing fancy, but the colors worked well in the space and it blocks out light when I want it darker up there. 

Then I made custom 20x30 posters to fit IKEA frames.   DSC_4049-2

These by themselves were quite the project.  I made them all myself in Photoshop, but getting them to fit in those weirdly sized Ikea Frames from prints that weren’t the same dimensions was a bit more math and measuring than I care to do.  They turned out great, though and I love them! 

Now I just have to refinish or paint the little kids table and find some chairs that I like to go with it.  I think Sam will love having a little table to sit at and color and play.  I also need labels on the bins so that Luke has an easier time putting toys away on his own. 

So what do you think of my new space? 

Thursday, April 04, 2013

Birdhouse Village and other Spring Decor

I always feel kinda cheated out of celebrating Spring when Easter is in March.  April is still all Spring to me, so I am leaving up this stuff all month! {ok, I might take down the bunnies…}

I’ve been working on a very cute project that really stretched my creativity! I haven’t done something like this in a long time.  It is not as easy as it looks to coordinate 8 different birdhouses using different patterned papers, and several different paint colors and have them look like they all belong together!  I had to re-do a few houses along the process when I made some dumb choices, but they turned out super cute!  Birdhouse Villiage by Smile Like You Mean It

I used some small candle holders and a bowl {from the thrift store} to help give my houses some different heights.   Birdhouses 4Birdhouses 1Birdhouses 3Birdhouses 2Birdhouses on the Entertainment Center

I LOVE how it turned out!  Such a happy thing to look at when I go into my living room! 

I’ve also had the mantle done for a couple weeks, and we recently put up some new bamboo shades on the windows to help with our overbearing sunlight situation. 

Here’s the mantle:Spring Mantle Decorating

Mantles are not my strong suit, but I think this one turned out cute enough. I used paper doilies from hobby lobby for the garland. My mom crocheted those bunnies for the boys the last two Easters. Easter and Spring Mantle Decor

And here are the new shades! Bamboo shadesI can’t even begin to tell you how much I love these! Our living room gets SO MUCH LIGHT and we were in dire need of a way to block out light on super sunny days! Now we can pull these babies down and watch TV or play the XBOX without getting a headache from all the glare and brightness!

Combine all these things together and I’m loving the living room right now! It’s so fresh and happy! Living RoomNow I just wish I could figure out the furniture {blah} and fix the gallery wall behind the couch {not pictured for a reason!} Happy Spring!!

Monday, March 25, 2013

Craft Closet Organization with Pull Out Fabric Shelf

This past week {or two} I’ve been cleaning out and organizing my craft closet.  I don’t have a craft room, just an extension of our computer desk, so most of my supplies live in their own closet in the hallway nearby. 

My craft closet used to look like this:Craft-Closet-Before

Now it looks like this:Craft-Closet-After 
All in all, it wasn’t too bad for a while.  It stayed organized this way for about a year.  But after hoarding more supplies and fabric and shoving more unfinished projects and mess into this closet, it started looking really really bad! Here’s just a glimpse of what’d it become…I don’t dare show the rest!Fabric-Mess-in-the-Closet

With some work, I conquered the fabric and scraps and now have a better system for it.  After that I needed to work on the rest of the closet and make it more functional, too. 
One more time, here is the new pull-out fabric shelf.  (Click here to see how I built it).  It fits perfectly in the odd little nook that is in this closet.  Fabric Pull-Out in Craft Closet

Starting from the bottom of the closet to the top, we first have the rest of the fabric.  Large yardage, denim, sweater material fits into the large bin, and all the scraps are sorted by color into ziplock bags in the smaller bin.  If the scraps or other fabric starts overflowing again, it’s time to purge!  Fabric-Bins-on-the-Bottom

Next shelf up is ribbon and yarn.  I decided that ribbon is one of the hardest things on the planet to organize and no one has yet come up with an absolute perfect system.  I hated nearly all the things I found online, so I ended up using these two bins for ribbon.  Luckily it all fit!  I did have to purge some ribbon that I decided I could part with to make them fit, but compared to how I stored my ribbon before this is a better solution.Ribbon-and-Yarn

I spent 2 1/2 hours on Saturday organizing just my scrapbook paper!  I first went through the entire 50lb stack and removed all the paper I didn’t love any more.  I ended up clearing out a third of the entire stack! Then I organized all the papers into color family and then re-stacked it to put back in the closet. I could have put it all into separate 12x12 bins for easier access, but I like it this way because it takes up less space. I can usually find what I want without too much hassle.  Paper,-Punches,-and-Stamps

Next to the paper I have all the envelopes, and next to that I have two more bins. These supplies used to be in just one basket, but it was hard to find things and got messy fast. Now they are organized into stamps and the other is punches & Cricut supplies {extra blades, a few cartridges}.
Here’s the Punches & Stamps bins:Punches-and-Stamps

Fun!  Just looking at all those stamps in one place makes me want to start making something!!
Next shelf up is Kid’s Craft and a few miscellaneous things on the side.  The basket on the right has all kinds of things—pipe cleaners, googly eyes, foam stickers, fuzzy poms, and more.  The one on the left has markers, colored pencils, fabric markers and things like that.  Kids-Craft

Lastly, the top of the closet stores all the smaller storage tubs with all the other various supplies!Top-of-Closet-bins

There are three bins marked “Craft” and that’s pretty vague, but for me that just means it’s a random mix of supplies that don’t really need their own bin. Here’s what’s inside:Craft-Bin-Miscellaneous

And that’s it!  I’m so glad I decided to tear it all out and organize each shelf and bin.  It’s so much easier to think and create when there’s not a cluttered mess everywhere!
BEFORE:Craft-Closet-Before
AFTER:
Craft-Closet-After

I’m proud to say that I didn’t buy a single tub or basket to organize this closet! I was able to use what I had around the house and not spend a dime! Thy only money spent was on the fabric shelf for the wheels and the handles.  I already had the primer and paint. The three smaller red tubs used to be on Sam’s changing table shelves, but we got him a dresser so they made their new home here!  Love it when that happens!

I’ve been working on the craft desk itself, but there’s still more work to be done, so here’s a sneak peak of what I’m working on for Easter until I’m ready to show that off. Can you guess what it is? Easter-Project-Preview

Tuesday, March 19, 2013

Conquering the Fabric Pile

I’m not sure what came over me, but last week and I randomly just emptied out ALL of my fabric, and all of my scrap stashes onto my guest bed. Fabric-Hoard
Well it might have had something to do with this mess:Fabric-Mess-in-the-Closet
Fabric-in-closet-2


 I couldn't even shut this door anymore!

Something had to be done so I guess I just got fed up with it and threw it ALL onto the guest bed.  I had tons of scrap stashes, too.   A drawer full, a bin, and an old scrapbook carrier full.scrap-stash-1

Oh wait there was this little basket, too.  scrap-stash-2

Then I started organizing all the larger pieces by color.  This was fun, actually. Fabric-Sorted

But the not so fun part was folding it all again.  It took me several days of going back to work on it since Sam {The Destroyer} couldn’t be near by to ruin my hard work.  I just measured the shelve and cut a piece of cardboard about that same size to use to fold my fabric with.  cardboard

Here’s some of the progress. Fabric-folded

Then I also got started on the shelf itself.  It’s nice that it fits perfectly in the odd nook part of my craft closet, but I felt like it needed to be white to match the rest of the closet innards.  Being white also makes it less distracting from the fabric itself.  Getting-started

I used Zinsser Bulls Eye 123 Primer because I already had a quart of it in the garage.  I’m not sure why I bought it originally, but I used it as a primer for these shelves.  They are just crappy Ikea shelves from an old entertainment unit we took apart, so it wouldn’t matter if I screwed them up somehow.  It took 3 coats of primer and then 3 coats of white paint to get these shelves to be somewhat decent looking.  I wish I’d just kept the shelves themselves on the unit, because the paint got scraped off pretty easily when I put them back in.  I just took a can of spray paint to the messed up spots.  Priming-the-shelves

I drilled and screwed in 4 wheels into the bottom—all by myself.  My first attempt at using the drill!!  DSC_2541-2

I also drilled and screwed in handles. And here it is in the closet!DSC_2545-2 DSC_2546-2


I put a board on the floor to help the shelves easily roll in and out and it works perfectly!! 

I bet you are wondering what happened to all those scraps, too?  They were separated into color families and put into Ziploc bags which were then put into a smaller bin.  Smaller to allow for the roll-out shelf to do it’s thing.  If my scraps outgrow this bin, then it’s time to purge again.  No reason to hold on to tons of scraps that won’t get used!  The large yardage, denim, sweater material and large pieces of felt and flannel got organized and put into the big bin.  Fabric Storage

Phew!  Overall it took two weeks, but so worth it!
I actually kinda feel like sewing something now…

other posts you may like

Related Posts Plugin for WordPress, Blogger...